Don't Quit! / Can't Stop!
-----------------------------------------------------------------
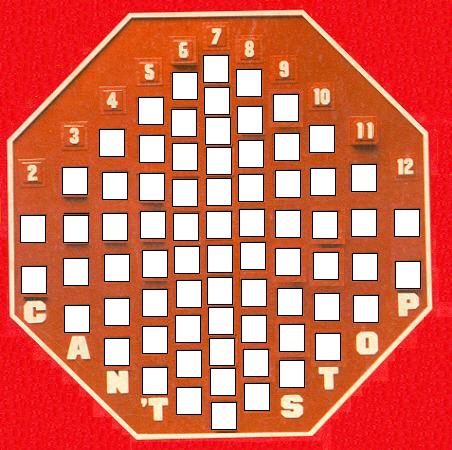
Rules for Don't Quit

OBJECT
To be the first player to reach the top of any three columns

EQUIPMENT
1 game board, 3 markers, 4 dice, 44 colored squares-- 11 squares
  each of four different colors

SET UP
1 Each player chooses a color and takes all the squares of that
  color.
2 Each player rolls two dice. The player who rolls the highest
  number goes first; play then proceeds, in turn, to that player's
  left.

PLAYING
1 To start your turn, roll all four dice look your roll over carefully
  Then split your roll in half in any way you wish, and add the two
  dice in each half. The purpose: to create a pair of numbers.
  Example: let's say you roll a 1-5-4-6. With this roll, you can
  create any of the following pairs: 6 and 10 (1+5) and (4+6); or
  5 and 11 (1+4) and (5+6); or 9 and 7 (5+4) and (1+6).
2 The pair of numbers you choose to create represents the two
  columns into which you must now place markers.
  Example: On this roll of 1-5-4-6, let's say you choose 6 and 10
  as your pair. You must now place a marker into the "6" column
  and another marker into the "10" column.
  When first placing a marker into a particular column, always
  place it onto the space at the bottom of that column.
3 In this game you may roll more than once on a single turn. On
  each additional roll, you also create a pair of numbers in the
  same way.
a) Let's say you roll again and create a pair that includes a
   number you've already chosen. When this happens, move
   the marker up one space in that number's column.
b) Let's say you roll again and decide to create a pair with a
   new number. If you have another marker left, you must place
   it into the new marker's column.
   Examples: From your first roll you already have a marker in
   both the "6" and "10" columns. On the same turn you then roll a
   2-4-3-5. If you choose to create 6 and 8 as your pair, move the
   marker in the "6" column up one space and place the third
   marker into the "8" column. If, instead, you choose to create 5
   and 9 as your pair, you must place the third marker into either of
   these columns and ignore the other column. If you choose to
   create 7 and 7 as your pair, you must place the third marker two
   spaces up in the "7" column.
4 You may continue to roll as long as your last roll allowed you
  either to place a marker or to move one up. If you prefer, you
  may stop your turn whenever you wish. To stop, simply replace
  each marker with one of your colored squares.

Placing a Marker
a) If you choose a column that does not already have one of your
   colored squares in it, place the marker onto the space at the
   bottom of that column.
b) If you choose a column that does already have one of your
   colored squares in it, place the marker onto the space directly
   above your colored square.
c) You may place a marker onto a space that's already occupied
   by an opponent's colored square.
d) If you can place a marker on your roll, you must.
   Example: Let's say you've already placed markers into the "3"
   and "6" columns and you roll a 2-4-5-5. If you want to move up
   the marker in column "6", you must place the third marker into
   column "10". Otherwise you must place the third marker either
   into column "7" or "9".

Blowing It.
   When your roll will not allow you either to place a
   marker or to move one up, you've "blown it" and must end your
   turn. Remove all of the markers that you've placed, but leave all
   of your colored squares that are already on the board.
   Remember: As soon as you've placed all three markers on your
   turn, each additional roll on that turn must allow you to move up at
   least one of the markers. Otherwise you've "blown it" and your
   turn ends.

Winning a Column.
   You win a column as soon as  you place one of your colored squares
   onto the number at the top of that column.
   If any of your opponents already has a colored square in a
   column that you win, he or she must remove that square
   immediately.
   a) A marker on the number at the top of a column does not mean
      you've won that column.
      Example: Let's say you've placed markers into columns "3",
      "6" and "8", and that you've just moved the marker in column
      "6" to the number at the top. You could stop your turn now and
      win that column by replacing each of the markers with one of
      your colored squares. You decide, however, to roll again --
      hoping to win columns "3" and "8", too. You roll a 2-4-5-5.
      Tough luck. You have no more markers to place, and you can't
      move the marker in column "6" any higher than it already is. So
      you've "blown it" and must end your turn by removing all of the
      markers that you've placed. In other words, you do not win
      column "6".
   b) You may not place a marker into a column that someone has
      already won-even if you've won that column yourself.
      Example: Let's say that columns "6", "8" and "10" are already
      won, and you roll a 2-4-4-6. You've "blown it" -- even if you
      still have markers to place.

WINNING
The winner is the first player to win any three columns.

A STRATEGY HINT
   The shortest columns are not the easiest to win. Why? Because
   on any given roll, the numbers you're most likely to create are 6, 7
   or 8. Consider this fact when placing markers and when deciding
   whether or not to stop your turn. Use your knowledge of probability!
|